Immunofluorescence is a powerful tool that we utilize at Visikol to image whole tissues and 3D cell culture models. The imaging of large tissues can provide powerful quantitative insight into the sample of interest like protein colocalization, spatial information about cell viability, and penetration depth of test compounds. But something to keep in mind is that all the forces acting on potential therapeutic compounds to keep them from diffusing into the tissue of interest are also at work on the primary and secondary antibodies used in immunofluorescence. The size and charge of the antibodies, the affinity of the antibody and antigen, and the density of the tissue can all influence the ability of the antibody to diffuse through the tissue and successfully label the epitopes of interest. If the antibody is able to diffuse through the tissue you still might run into the problem of exhaustion, where the antibody is effectively used up by binding to epitopes closer to the surface. And finally, when imaging the antibodies, as you go deeper into the tissue the fluorescent signal will be affected by attenuation giving the appearance of a gradient even if labeling is evenly distributed.
These potential imaging problems have a number of solutions that can be implemented before, during, and after labeling to prevent them from biasing your results. The simplest is increasing the incubation times for the primary and secondary antibodies. The next option is a permeabilization of the tissue sample; solvents like methanol or DMSO, detergents like triton or tween, enzymes like trypsin, or physical tissue swelling can all provide different mechanisms for opening the tissue to antibody labeling. Antibody exhaustion can be tested for using a second incubation of the primary with a different secondary, alternatively the tissue can be cut in half to see if additional labeling is possible on the now exposed core tissue. Signal attenuation caused by the depth of the tissue sample must be addressed either by cutting tissues with a smaller thickness during sample preparation or by relying on ImageJ processing. The ImageJ plugins Stack Contrast Adjust and Attenuation Correction both provide software solutions to decreasing fluorescent signal strength.

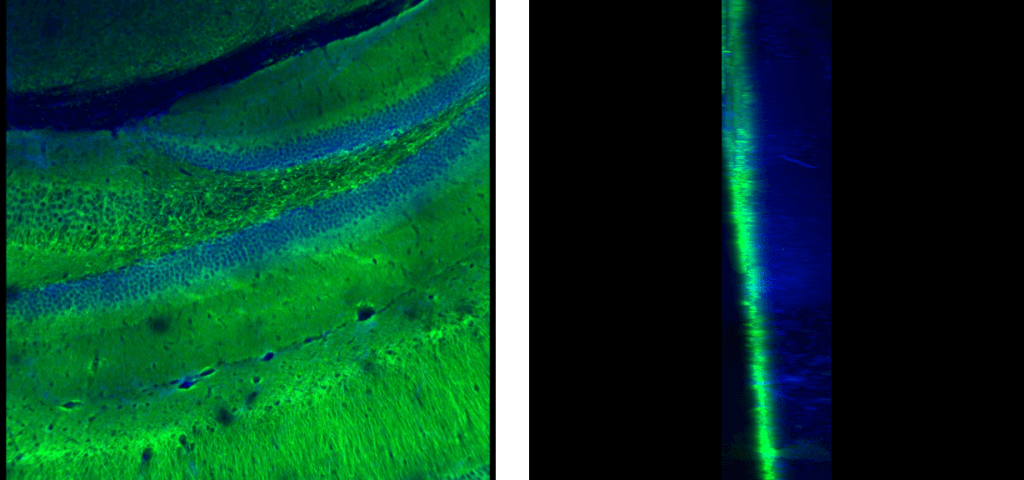
Left: Antibody Label – Green, Nuclear Stain – Blue, XY View. Right: Antibody Label – Green, Nuclear Stain – Blue, YZ View
A good way to measure the effectiveness and penetration of antibody labels is the creation of a voxel stack of a section of the tissue of interest. This is done by calculating the length per pixel of the X or Y dimensions and using that as the Z-step for image accusation which results in a Z-stack of images with an equal pixel density from any direction. For example, an image stack taken with a field size of 842.38 µm by 842.38 µm and a camera acquisition mode of 1104 pixels by 1104 pixels gives a density of 0.763 µm per pixel and a step size of 0.763 µm. Because the pixel density is constant the resulting voxel stack can be viewed from any side without loss of resolution. This can give us important spatial information, in the example images there is good staining for both channels but only the nuclear stain has good penetration. Meaning the antibody staining protocol requires more optimization. Things to consider when imaging Voxel Stacks is the considerable increase in imaging time and size of the resulting files, be sure to pick the correct tissue area of interest to avoid needing to image a large number of fields.
Author: Dr. Peter Worthington
