With the widespread adoption of 3D cell cultures as more physiologically relevant in vitro models, there has arisen a need to adjust the methods of characterizing these models that may differ from standard 2D cell cultures.
The standard immunofluorescent labeling to visualize protein expression in cell cultures is one method of characterization that must be altered in most cases to be fully utilized for 3D cell cultures. This is because the nature of the 3D culture is one more similar to larger whole mount samples like tissue sections taken from tumors or organs. In addition, the imaging of such cultures requires tissue clearing along with high-content confocal instrumentation rather than basic widefield microscopy in order to sample at any significant depth within the tissue.
We have developed a protocol suitable for labeling dense neuronal microBrain 3D® models available from Stemonix®. These organoid models are larger (>500 um diameter) and denser (>4000 nuclei) than typical 3D cell cultures and require more extensive permeabilization to be able to immunolabel more than just the outer periphery of tissue. For this, a short treatment of Visikol’s Permeabilization Buffer is needed to loosen the tissue enough for antibody penetration.
The following protocol can be used for most types of 3D cell cultures, and steps have been added where more extensive permeabilization is necessary. The assumption is that the models will be in either 96- or 384- well plates, but optimization of these steps may be easier if a small number of models can be transferred out into a micro centrifuge tube for processing. Accordingly, the volumes would vary but are the following per step depending on vessel type:
- 96-well Plate – 200 uL per step
- 384-well Plate – 75 uL per step
- Microcentrifuge Tube – 1 mL per step
Tissue Processing
- Fix tissue in your chosen fixative. After fixing for 20 min – 1 hour, remove and transfer to PBS with 0.05% sodium azide for indefinite storage.
- Wash tissue in PBS solution 2X for at least 30 minutes each before further procedures to remove traces of fixative.
- If tissues have been cryopreserved, wash an additional 3-5 times with PBS for 30 minutes to ensure complete removal of the mounting media.
Permeabilization
Dense 3D Cell Cultures: For normal 3D cell cultures, start with step one below and proceed with immunolabeling. If the 3D cell culture model is particularly dense and achieving successful penetration of antibody label throughout the tissue is difficult, treat with Permeabilization Buffer for 30 minutes at room temperature. These 3D cell culture models will have properties like densely packed cells, higher collagen or ECM content, or particularly large size (>500um diameter). After treatment, wash 3X in PBS to remove traces of remaining buffer. Be sure to wash tissues thoroughly as the Permeabilization Buffer contains a strong detergent that will dissociate the culture if left in too long.
- Wash tissue at room temperature in PBS for 20 minutes, then in 50% methanol (in PBS) for 20 minutes, 80% methanol in DI H2O for 20 minutes, and finally 100% methanol for 20 minutes. Samples can be stored in methanol (preferably at 4ºC) indefinitely before proceeding with the next step.
- Wash samples at room temperature in 20% DMSO/methanol for 20 minutes, then in 80% methanol (in H2O) for 20 minutes, 50% methanol (in PBS) for 20 minutes, PBS for 20 minutes twice, and finally in PBS/1% Triton™ X-100 for 20 minutes once before further staining procedures.
- Incubate samples at room temperature in Penetration Buffer for 30 minutes with gentle shaking.
- Block samples in Blocking Buffer at 37°C with gentle shaking for 1 hour.
- Incubate samples in a primary antibody dilution prepared in Antibody Buffer and incubate at 37°C with gentle shaking for 2 hours.
Depending on the specific antigen, an antibody dilution of 1:50 to 1:500 is typically required. Obtaining a proper dilution factor for your antibody is the most critical variable in achieving good labeling. Typical working concentrations of Primary Antibodies for labeling brain tissue are in the 1-10 ug/mL range. To prevent aggregates, we recommend centrifuging or passing the solution through a 0.45µm syringe filter prior to use, especially for secondary antibodies.
- Be sure to dilute the 10X Washing Buffer to a 1X working concentration before using.
- Wash samples in 1X Washing Buffer at least 3 times, 30 minutes each time, at 37°C, with gentle shaking.
- Incubate in secondary antibody buffer (1:100 to 1:500 depending on dilution of primary antibody) prepared in Antibody Buffer at 37°C with gentle shaking. Incubate samples for 2 hours.
- Wash in 1X Washing Buffer at least 3 times, 30 minutes each time, at 37°C, with gentle shaking.
- Wash with PBS 2X, for 20 minutes each before proceeding to dehydrating and clearing. Samples may be kept in PBS indefinitely before proceeding with clearing steps.
Tissue Clearing
- Optional: Treat tissue at room temperature with 50% methanol in DI H2O for 20 minutes, then 100% methanol for 20 minutes with gentle shaking. Visikol HISTO-M can absorb up to 10% H2O by volume, so it is imperative to remove as much water from the vessel in which the 3D cell culture has been processed. If removal of excess water is not feasible, adding the dehydration steps may be necessary to ensure effective clearing.
- Remove remaining PBS or Methanol and add Visikol HISTO-M.
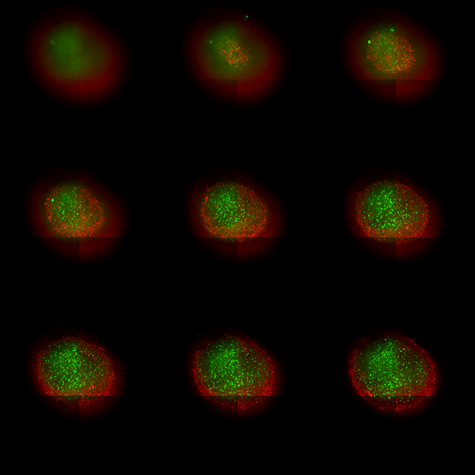
Figure 1. microBrain 3D model labeled with NeuroTrace Green (green, Thermo, N21480) and GFAP (red, 1:200, Abcam ab68428)
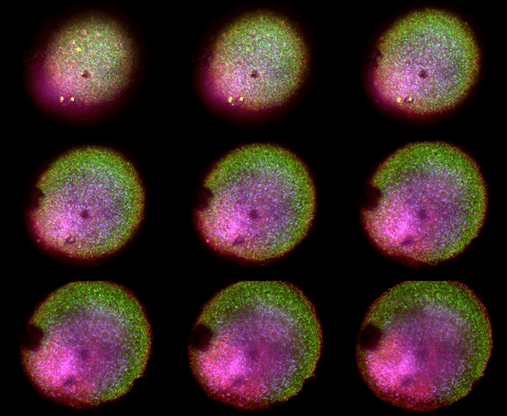
Figure 2. microBrain 3D model labeled with DAPI, VGlut1 (green, Abcam, ab134283), NeuN (red, Abcam, ab177487), and Live/Dead Fixable stain (yellow, Thermo, L23102)

Figure 1. microBrain 3D model labeled with NeuroTrace Green (green, Thermo, N21480) and GFAP (red, 1:200, Abcam ab68428)

Figure 2. microBrain 3D model labeled with DAPI, VGlut1 (green, Abcam, ab134283), NeuN (red, Abcam, ab177487), and Live/Dead Fixable stain (yellow, Thermo, L23102)

