Visikol collects thousands of images every day, and each one of them goes under certain levels of scrutiny before analysis to ensure the highest level of data extraction. To accelerate the acceptance of these images, tools were developed using Jython because wrapping common imageJ routines in Python is simple and can be tailored to many applications. This article recreates a simplified version of the tool used for rejecting images corrupted by artifacts and contaminates.
Firstly, use the Recorder to capture code needed in the original macro language (Image 1). The first command is recorded as ‘I’ import images containing “c001” from a single directory via the Import Image Sequence function; the images are sorted by filename. The second command was recorded after creating a montage of all the images we imported and rescales them by default values. The third command changes the color table to blue, which is consistent when referencing the nuclear channel.

Image 1: The Recorder can be accessed through Plugins/Macros/Record, and tracks actions in real time.
Next, change the language from IJ1 Marco to Python (Image 2). This will change the API language but does not translate the code that was just recorded. If the code is run at this point, you will come across a few Name Error’s . In most cases, many commands are supported by the IJ library, so importing this library and appending “IJ.” before each command “run” will make this code useable. Adding the OpenDialog library will also give you the opportunity to replace the hardcoded path with a “directory” variable; this is an extremely user-friendly function (Image 3).

Image 2: After pressing “Create”, use the Language tab to switch the language to python in the API.

Image 3: Updated analysis routine converted into python, with some useful additions.
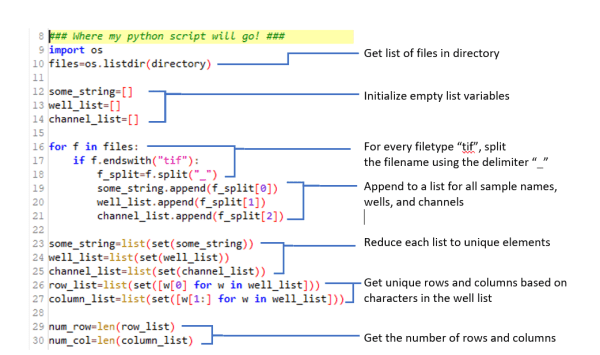
Once you’ve successfully converted an imageJ routine into a python suitable format, you can now add additional python code that satisfies the imagination. What if you wanted to organize the montage to be viewed just like our well-plate? What if you wanted to view the next channel? Trying to attempt this through java scripting could be an egregious amount of work …. But with python, we are only several lines of code away. The code below (Image 4) extracts metadata from files formatted like Name_A01_c001.tif where A01 indicates the first well position, and c001 indicates the first channel number (Image 4).

Image 4: Python code that extracts metadata from filenames and gives us well-plate information.
After extracting the well-plate information directly from the metadata, you can replace the hardcoded values in your original commands and wrap everything up in a loop. Regardless of the well plate size, images will now be displayed in the correct arrangement (Image 5).

Image 5: Updated routine that now loops through all channels, in colors specific to that channel.
With 40 lines of code, we have created a tool that displays all the images acquired in a single well plate. Below are some images used in the investigation of spheroid integrity in relation to reagent stripping and cell degradation (Image 6). From these images, the DAPI signal is strong, but there is a concerning level of variation in the second and tertiary labels.
Visikol is constantly discovering creative solutions to breakthrough areas of research in both the multiplexing and cell culture spaces. Please reach out if you have a complex challenge you would like to collaborate on!

Image 6 : Max Projection of spheroids in wells A01:D03 , DAPI (blue)
