When performing research, it is common to analyze multiple replicates per group in order to gain statistical significance in the results. However, it is tedious to analyze each image one at a time, which is why creating a batch analysis pipeline is a useful tool for analyzing large image sets. Visikol routinely analyzes data sets with thousands of images for clients in various ways, and one of the many programs used is ImageJ, where the macro language is utilized to run batch analysis. This introduction demonstrate the basics of setting up a pipeline to analyze multiple images.
Part 1: Setting up a Macro
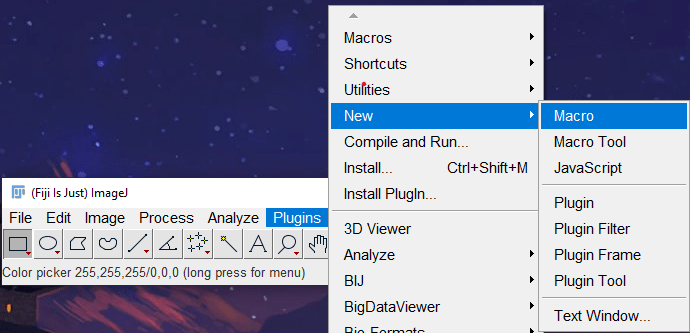
In order to begin writing a macro, you must go to ‘Plugins –> New –> Macro’ (Figure 1), which will then open a new macro file for you to edit. To save the file, you can go to ‘File –> Save’ in the top left corner. One thing to note is that ImageJ macros can be thought of as programming scripts where you can run loops, functions, and if statements as well as set variables. In order to set up a macro for processing a bulk number of images, we will use some built in functions, which will allow us to obtain the images and have them ready to process and help for these functions can be found in online ImageJ documentation or through a help box that will pop up when you type the function.

Figure 1. Path to starting a new macro.
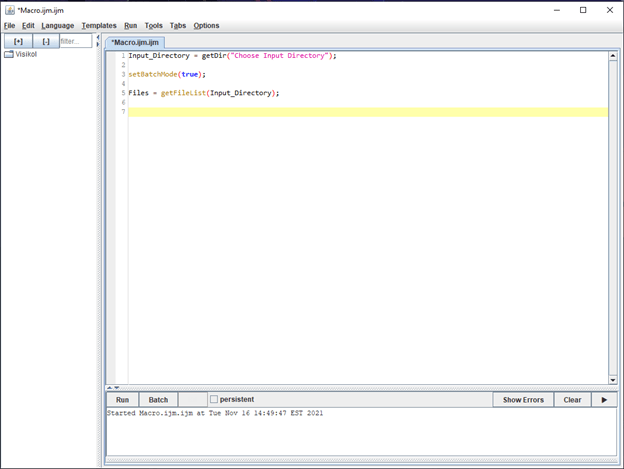
First, we need to set a variable equal to the ‘getDir’ function, which will allow you to choose the image directory. Next, use the function ‘setBatchMode’ to true in order to avoid ImageJ from showing every processing step, which will greatly slow down analysis. From there, set another variable equal to the ‘getFileList’ function, which will obtain a list of all the files in the directory (Figure 2).

Figure 2. The ImageJ macro window showing code to obtain images.
Part 2: Processing the Images
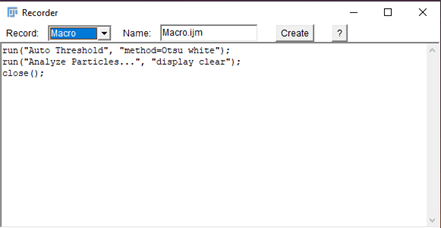
To start processing the images, use a for loop to go through each image in the image list, then open the macro recorder in ImageJ by going to ‘Plugins à Macros à Record’ (Figure 3). The macro recorder is a useful tool for obtaining the ImageJ functions to use when processing the image. For this introduction, we will simply threshold an image and use analyze particles to measure some attributes about the image (Figure 4). Once you have run through the processing on one image, you can copy the functions from the macro recorder into your macro script and change it so that it will suit the images you want analyzed.

Figure 3. How to get to the macro recorder.

Figure 4. ImageJ macro recorder.
Part 3: Running and Saving the Results
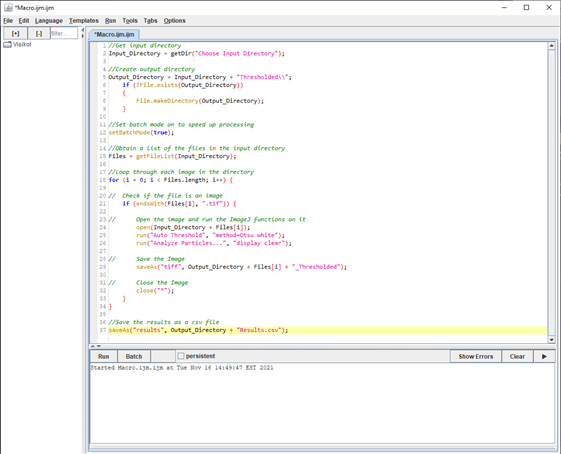
You can use the ‘save’ or ‘saveAs’ functions in order to save images or results, and once the script is set up, just hit the run button to bulk analyze all the images and save the resulting data (Figure 5).

Figure 5. Fully written ImageJ macro ready to be run.
Being able to batch analyze a large amount of research images is vital for obtaining data in an unbiased and efficient manner. Visikol routinely performs batch analyses on the huge number of images received daily from the research conducted and are experienced in building pipelines to extract various data points to answer a plethora of research questions. If you need our image analysis services or have any questions, please feel free to contact us.
